
Soft Pretzels
Servings: 8
Notes:
I'm going to sound like a broken record. This recipe uses food grade lye. Lye can and will hurt you if you're not careful. Lye is poisonous and extremely caustic. Lye can be LIFE THREATENING if misused. Store lye in a place that kids and pets cannot get to it. Do NOT use it unless you understand how dangerous it is! When making the lye bath, you should wear protective eye equipment. The eye protection should cover your eyes from the front, top, bottom, and sides! You should also wear rubber gloves. While not required, you can also consider wearing easy to remove clothing.
- We're using lye because pretzels were traditionally made with lye. Lye interacts with the wheat proteins on the surface of the pretzel to make a very unique texture, smell, and taste which I have yet to find a way to replicate without using lye.
- You won't find food grade lye in any physical stores (at least, I haven't found any). You pretty much have to order it online. I personally source my lye from Amazon sellers.
- This recipe is based on Alton Brown's soft pretzel recipe which can be found here. I modified the recipe to use a lye bath instead of the baking soda solution Alton uses. I'll also include a slightly modified baking soda solution if lye bothers you or you don't have any/can't be bothered to get any.
- I recommend using rubber gloves (Latex, nitrile, or normal cleaning gloves, like what you'd use for doing the dishes) when working with lye or the lye bath. If you don't wear gloves while you're dipping the pretzels, you're likely going to dissolve your fingerprints and won't have them for a few days, even with the highly diluted lye. It won't hurt, but you'll realize how much grip your fingerprints give you. I'm really not joking.
- Obviously, the pretzels are completely safe to eat after they're baked. I don't know the exact chemistry, but something about the baking process makes the lye present on the pretzel break down (or something) and be not poisonous or caustic anymore.
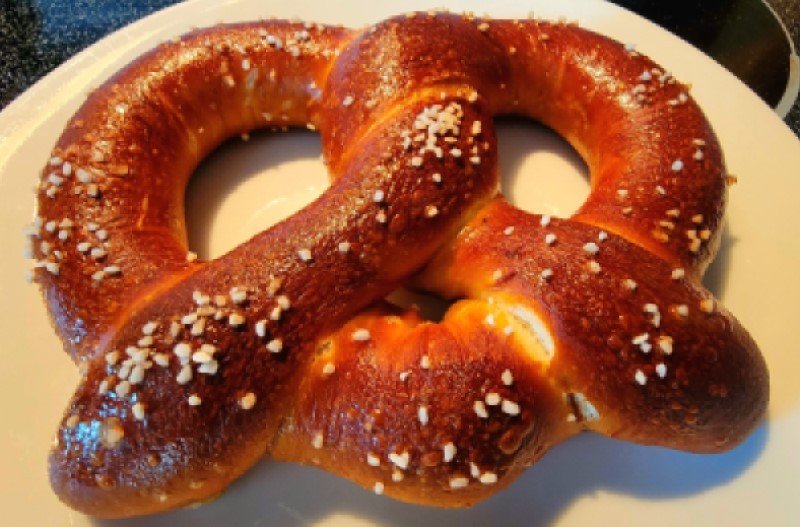
- Pretzel salt is different from other salts in that it's got a lighter, crispy-ish texture, and comes in large, matte, opaque crystals in the shape of tiny spheres, like you would expect a pretzel to have. Pretzel salt isn't a requirement, but it stands up considerably better to baking than even coarse kosher salt, or large crystal finishing salts. I've only ever been able to find pretzel salt online. I personally source my pretzel salt from Amazon sellers.
- If not using a stand mixer, just do everything involving the dough up to kneading the dough in a large bowl with a wooden spoon. Once you've combined the flour and water and are ready to knead the dough, turn it out onto your counter and start kneading. Enjoy the workout!
Special Equipment Needed
- Kitchen scale
- Stand mixer with dough hook attachment (Optional)
- Large plastic containers made of #2 high density polyethylene (aka HDPE) or #5 polypropylene (aka PP). This should be something like a bowl or food storage container with a wide enough opening to dip the formed pretzels into. Alternatively, glass bowls can be used, but are less resistant to lye's caustic nature.
- Rubber gloves (Optional but highly recommended)
Dough Ingredients
- 355 milliliters warm water (100-110 degrees Fahrenheit)
- 13 Grams sugar
- 6 Grams kosher salt
- 7 Grams active dry yeast
- 630 Grams all purpose flour
- 56 Grams melted butter
- 1 Egg yolk beaten with 1 tablespoon water
- Vegetable oil
- Pretzel salt
Lye Bath
Pop quiz! What is lye? That's right, really dangerous.
Lye Bath Ingredients
- 300 milliliters cold water
- 12 grams food grade lye
The containers of food grade lye will state they are food grade. Do NOT use lye that you aren't sure is food grade. You WILL be making poison.
If you're making a larger batch of pretzels, you might consider making a large lye bath as extended use of the bath can dilute the bath over many pretzels, reducing the effectiveness of the bath. Aim to make a bath with 4% of lye by weight based on the amount of water used. For example, if using 100 milliliters (1 milliliter of weighs 1 gram (and is also 1 cubic centimeter, wow!)) of water, use 4 grams of lye.
Lye Bath Directions
NEVER POUR WATER ONTO LYE. ALWAYS POUR LYE INTO WATER. Lye produces a significant amount of heat when it contacts water, and pouring water onto lye can cause instant boiling, which can splash highly concentrated lye water, which can burn you both thermally and chemically!
NEVER USE ANY KIND OF METAL CONTAINER FOR THIS, ESPECIALLY ALUMINUM. Most metal used in the kitchen, especially aluminum, is highly reactive to lye and WILL be damaged by the lye solution.
- Place water in a lye-safe container. (See special equipment)
- Sprinkle the lye over the top of the water. Do NOT pour water onto lye.
- Carefully stir the mixture with a plastic utensil made of HDPE, PP, or wood until all of the lye is dissolved. Do not use a metal utensil.
The lye bath will be hot, but not hot enough to damage anything via heat alone. If you spill any of the lye bath, it's okay! Just wipe it up with a paper towel and then go over the area with a damp rag or paper towel ASAP. At this point the lye bath is still pretty caustic and will eventually damage things like your counter tops, but not enough so to cause immediate damage to most materials.
If you get any of the lye bath on your skin, rinse your skin ASAP. The lye bath will not immediately burn you, but you will almost certainly get some minor irritation on the points of contact.
Alkaline Salt Bath
Alkaline Salt Bath Ingredients
Use this if you can't/won't use lye. The results are still good! Baking the boking soda will increase its alkalinity and is the closest thing I've found to using lye.
- 400 Milliliters water
- 40 Grams baking soda
Alkaline Salt Bath Directions
- Preheat your oven to 300 degrees Fahrenheit.
- Cover baking sheet with parchment paper. The process can damage your baking sheet if this is done without a protective cover - do not use aluminum foil, which is reactive enough to possibly be a problem here.
- Bake the baking soda for an hour.
- Heat water in a pot until simmering. Stir alkaline salt into simmering water until dissolved.
Directions
- In the bowl of your stand mixer, add warm water, sugar, and salt. Stir to dissolve sugar and salt into the water.
- Sprinkle the yeast on top of the water. Stir lightly, then wait about 5 minutes. If your yeast is alive, the mixture should smell kind of like cereal or beer and the mixture will be foaming/moving around by itself. If this stuff doesn't happen, your yeast is dead and you need to start over with new yeast.
- Add flour and butter to the mixture.
- Using the dough hook attachment, run your stand mixer at low speed until the flour is mostly incorporated with the liquid mixture.
- Turn your stand mixer up to medium. Run on medium for 4 to 5 minutes or until the dough is smooth and pulls away cleanly from the sides of the bowl.
Another good test is to pinch a golf ball sized chunk of dough and gently pull it up and away from the rest of the dough - if there aren't any major tears and the dough doesn't rip apart, the dough is in the correct state andis ready for the next step.
If you're hand kneading, you'll probably be kneading for 10-15 minutes before you get to this state.
-
Remove the dough from the bowl, clean and dry the bowl, and apply a light layer of oil to the bowl.
-
Form the dough into a smooth dome shape - it doesn't need to be perfect, don't worry. Place the dough smooth side down into the oiled bowl.
-
Cover the bowl tightly with plastic wrap and store the bowl in a warm place (an oven with the light on, on top of your fridge, or even next to a window or on your porch if it's above 70 degrees outside) to allow the dough to proof until doubled in size. This should take around an hour.
-
Preheat your oven to 450 degrees Fahrenheit. If you haven't already, make your lye or alkaline salt bath. Have I told you how dangerous lye is yet? Be careful.
-
Line a baking sheet with parchment paper. Coat the parchment paper with a light layer of oil.
-
Turn the dough out onto a lightly oiled work surface. Punch down the dough and divide it into 8 equal pieces.
Try to divide the dough as evenly as possible for the most consistent results. Start by forming the dough into a rough rectangle, then divide the rectangle in half, then those halves into quarters, then those quarters into eighths.
- Form the dough into the traditional pretzel shape. I recommend watching a video about how this is done, but I will try to explain below:
Keep the dough covered with some plastic wrap until you're ready to roll it.
First, form a small ball with a piece of dough. Next, roll the ball out with both hands flat, rolling away and towards you while gently pulling your hands apart, coaxing the dough into a rope. Aim to get the dough into a 24 inch rope - don't worry if you can't get it that long, just do your best! After you have the rope, form a U shape and cross the ends of the pretzels over one another, then over the bottom of the U shape, forming the classic pretzel shape. Gently press the ends of the rope into the part of the rope they contact, just to make them stick a little bit and better hold their shape.
Place the formed pretzel onto the lined baking sheet. Roll out the rest of the dough.
- If using the lye bath, carefully lower each pretzel, one at a time, into the lye bath using a plastic utensil, like a turner, fish spatula, etc. Use the plastic utensil to gently hold the pretzel under the surface of the bath for about 15 seconds. Remove the pretzel from the lye bath, allow to drain OVER THE BATH, and place back onto the lined baking sheet. Repeat with the remaining pretzels.
If using the alkaline bath, bring the bath up to a boil. Do the same thing as the lye bath, but hold the pretzels under the surface of the bath for 30 seconds instead of 15.
- Brush the pretzels with beaten egg yolk and water mixture. Sprinkle tops of pretzels with pretzel salt. Bake for 12 to 14 minutes, until deeply browned.
- While waiting for the pretzels to finish baking, dispose of the lye bath and clean all surfaces and tools that came into contact with the bath with a damp paper towel.
To dispose of the lye bath, place the container used in your sink and run a gentle stream of water from the faucet into the container. Allow the water to overflow from the container for a few minutes. The idea is that you're diluting the lye enough that it doesn't damage your sink, pipes, or septic system (even though most drain cleaners are lye, there are issues associated with it). After several minutes, dump and wash the container with warm soapy water.
- Remove pretzels from baking sheet and onto a cooling rack for at least 5 minutes before serving. You may need to use a spatula to loosen the pretzels.
No Comments